Appendix B: Git
Git is a version control system that allows you to track changes in your code and collaborate with others. It is widely used in software development and data science projects to manage code changes, maintain version history, and facilitate collaboration among team members. Git keeps a version history of your project and enables you to create branches for new features or experiments without affecting the main codebase. This feature makes it easy to work on multiple tasks simultaneously without impacting the main codebase.
To get started with Git, you need to install it on your computer. You can download Git from the official website: Git Downloads. Follow the installation instructions for your operating system (Windows, macOS, or Linux).
If you are an Apple user, you will need homebrew to install Git. Homebrew is a command line package manager. This means you will need to user the terminal to install it. If you do not have homebrew installed, you can install it by going to this link and following the instructions.
Installing Git via Homebrew on Mac
These instructions only apply to Apple users:
- Open the terminal application on your Mac. You can find it in the Utilities folder within the Applications folder, or you can use Spotlight search to locate it quickly. It should be called
Terminal. - Copy the script under “Install Homebrew” on the website.
- Paste the copied script into the terminal window and press Enter. (To paste in the terminal you might need to use
Command + vor right-click and select “Paste.”) - Follow the on-screen instructions to complete the installation. You may be prompted to enter your password during the installation process.
- Follow the instructions on the Git website to install Git using Homebrew. You will copy these lines into the terminal as well.
Once Git is installed, you can use it from the command line or through a graphical user interface (GUI) client. Some popular Git GUI clients include GitHub Desktop, Sourcetree, and GitKraken. These tools provide a more user-friendly way to interact with Git repositories and manage your code changes. VS Code, which this textbook will use as the default IDE, also has built-in Git support. I recommend you use VS Code and its Git integration features for a seamless experience.
Git Bash on Windows
If you are a Windows user, Git also comes with Git Bash, a terminal emulator that provides a Unix-like command-line environment for running Git commands. You can use Git Bash to run not only Git commands but any other Unix-like command in Windows. I strongly recommend you use this terminal for any command-line work this textbook covers.
In the next appendix, we will install some tools using the command line. If you are a Windows user, you will need to use Git Bash for these operations.
Git Repositories
Git operates based on repositories (or repo for short). When you git init a new project (or initialize a new repository via VS Code, or use uv init in appendix b), Git creates a hidden .git folder in the root directory of your project. This directory is not considered a git repo. It should be created in the core directory of a project. The .git folder contains all the necessary metadata and version history for your project, allowing Git to track changes and manage different versions of your code. It is important to note that the .git folder should not be modified manually, as it is managed by Git itself.
Think of all projects as existing in a single file directory (or folder) and this is the location that should contain the .git folder. This is the root directory of your project. You can create subdirectories (or subfolders) within this root directory to organize your code and other project files. However, it is important to note that Git will only track changes in files and directories that are within the root directory of the repository. If you create a subdirectory outside of the root directory, Git will not be able to track changes in that subdirectory. In fact, if you create something outside the root project folder, it should NOT be considered part of the project.
Cloning Git Repositories
Git was invented for collaboration. So, many websites have been created to host Git repos. The most popular of these is GitHub. GitHub is a web-based platform that provides hosting for Git repositories, allowing developers to collaborate on projects, share code, and manage version control. It offers features such as issue tracking, pull requests, and code reviews, making it a popular choice for open-source projects and team collaboration.
Most importantly for our purposes, it also allows you to clone a repo. Cloning a Git repo means to create a local copy of a remote repo onto your computer. This allows you to work on the code locally, make changes, and then push those changes back to the remote repo when you’re ready. Cloning a repo is a common practice in collaborative development, as it enables multiple developers to work on the same project simultaneously without interfering with each other’s work.
Note that you should NEVER clone one repo into another repo. This will create a nested repo and will cause problems with Git. If you want to work on a project that is already in a repo, you should clone it into a new directory that is not already a repo.
Committing Changes
Once you have made changes to your code, you need to commit those changes to your Git repository. Committing changes creates a snapshot of your code at a specific point in time, allowing you to track changes and revert to previous versions if needed.
To commit changes using the command line, follow these steps:
Open a terminal or command prompt.
Navigate to the root directory of your Git repository.
Stage the changes you want to commit by running the following command:
git add <file1> <file2> ...You can also stage all changes at once by using:
git add .Once your changes are staged, you can commit them with a descriptive message:
git commit -m "Your commit message here"After committing your changes, you can push them to a remote repository (e.g., GitHub) using:
git push origin <branch-name>
Committing Git Changes via VS Code
VS Code allows you to do this through the Source Control panel, which provides a visual interface for staging changes, committing them, and pushing to a remote repository. You can access the Source Control panel by clicking on the Source Control icon in the Activity Bar on the side of the window.
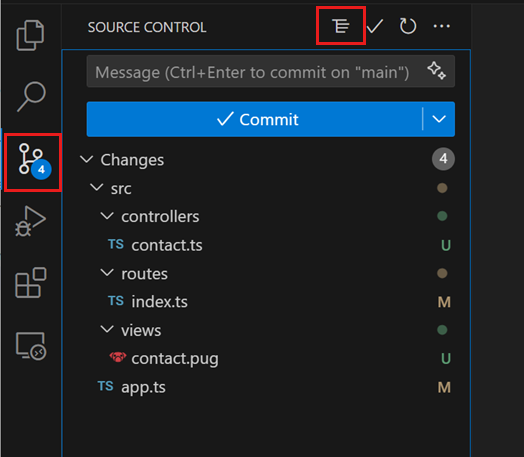
To read more on this, please reference the VS Code documentation on “Git in VS Code”.
The workflow is as follows:
- Make changes to your code files in VS Code.
- Open the Source Control panel by clicking on the Source Control icon in the Activity Bar.
- You will see a list of changed files. Click the “+” icon next to each file
- Enter a commit message in the input box at the top of the Source Control panel once you have staged all your files you desire to commit.
- Click the check mark icon to commit the changes.
- Now the Blue “Commit” button will change to “Sync Changes.” Click this button to push your changes to the remote repository.